Please follow the step below to lead you install the latest version Ubuntu 12.04 in your windows 7.
Note: this is not dual boot version.
Step 1: Preparation
a) Virtual Machine
- Url to download the Virtual machine : http://www.softpedia.com/progDownload/VirtualBox-Download-67177.html
- Click on the Softpedia Secure Download (US)
- Auto download will trigger
fig1.1
b) Ubuntu
- Url to download the Ubuntu 12.04: http://www.ubuntu.com/download/desktop
fig 1.2
- Recommended 32bit.
- Click on Start Download
Step 2 : Install the Virtual Machine to your Machine
fig.2.1
- You will find the VirtualBox-4.1.14-77440-Win.exe file (as shown as fig 2.1) downloaded to your machine.
- Double click on the file to start install the virtual machine
fig 2.2
- Keep on clicking on next and finish the VM installation.
Step 3: Create New Blank Virtual Machine
fig 3.1
- Launch the Virtual Machine
- Click on Start -> Oracle VM VirtualBox- > Oracle VM VirtualBox (as shown as fig 3.1)
fig 3.2
- Click on "New"
fig 3.3
fig 3.4
- Type in the Ubuntu in the column Name
- Operation System : Linux
- Version : Ubuntu
fig 3.5
- Arrange Memory for Ubuntu system
- Adjust it to at least 1024mb or more to have better performance for Ubuntu system (by default is 512mb)
fig 3.6
- Arrange Hard Disk Space for Ubuntu system
- Select the "Create new Hard Disk"
fig 3.7
Allocate it to 8GB, it can be more, but for me 8GB should be enough.
fig 3.8
fig 3.9
Summary of the system , then proceed to click on "Create"
Step 4 : Install the Ubuntu to the the Virtual Machine
fig 4.1
- You will see a Ubuntu Virtual Machine is on the list now.
fig 4.2
- Click on "Machine"
fig 4.3
- Select "Settings...."
fig 4.4
fig 4.5
- Select the "Display" -> tick on Enable 3D Acceleration
fig 4.6
- Select the "Storage" -> then click on "Empty" under the IDE controller -> and click on the Mount icon as shown in fig 4.6
fig 4.7
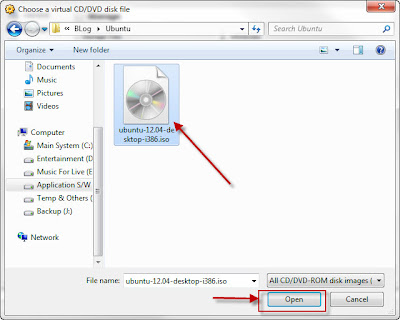
- Select the "Choose a virtual CD/DVD disk file....."
fig 4.8
- Locate the Ubuntu 12.04 iso file that you downloaded ealier then click "Open"
fig 4.9
- Now click "OK" to start the installation.
fig 4.10
- Select your Language then Click on the "Install Ubuntu"
fig 4.11
- Please be informed here, if you have a very good speed of internet connection, then you may tick on "Install this third-party software", else you may manually update it later, because it's really take time (around 10-20 mins).
- this updates is for your machine can read the those audio and video format such like mp3, mpeg ...etc
fig 4.12
- Select the "Erase disk and install Ubuntu"- NO WORRY , it will not erase any data on your machine. It will only use the 8GB that you allocate earlier to install the Ubuntu
fig 4.13
fig 4.14
- Enter your "City Name" to the column
fig 4.15
- Select your Keyboard Layout and Language then click "Continue"
fig 4.16
- Fill in all the necessary information and click on "Continue"
fig 4.17
- Wait for the Ubuntu to be finish to install, meantime you can click on next to see what's new update for Ubuntu 12.04 as shown at fig 4.17
fig 4.18
- Click on "Restart Now" to complete the installation.- Note: it will not restart your machine, but it's only restart the virtual machine.
fig 4.19
- Waiting for booting up.......
fig 4.20
- Enter your password to Login to the machine.
fig 4.21
CONGRATULATIONS!!!!!!!!!! YOU HAVE COMPLETED SETUP UBUNTU SYSTEM IN YOUR WIN 7 !!!!!!!!!!!!!!!!!!!!!!!!!!!!!!!!!!


Thanks brother, this is an excellent article and helpful !
ReplyDeleteThanks! very helpfull
ReplyDeleteThis may be a stupid question but can i delete the Ubuntu 12.04 iso file on the host computer?
got my answer here
ReplyDeletehttp://www.psychocats.net/ubuntu/virtualbox
what about windows virtual pc installer?
ReplyDeleteIs it okay? to use windows virtual machine rather than ORACLE Virtual Box.
ReplyDelete